If your app runs in the Mendix cloud you are probably using the Mendix Developer Portal to deploy your application. Deploying this way takes several steps: creating a deployment package, transferring it to the desired environment, and restarting the app. Each step can take several minutes after which you have to check back to see if you can progress further.
You’ll save a lot of time and frustration by automating this process. In this blog post, I’ll go over my automated deployment pipeline using Postman. The Postman collection contains several services for the Mendix API. It has services to build, transport, and deploy new packages. After setting it up, you’ll be able to use the Postman Collection Runner to run these requests in sequence and deploy with a single press of a button!
Find the finished collection here.
It includes a folder for new deployments and a folder to redeploy the last package. The latter can be used to transport a package from one environment to the other, i.e. from Test to Acceptance. You can start the Collection Runner on one of the folders depending on your use case.
Step 1: Preparing the environment
Create a new Postman Collection. We use that to store our requests and variables.
Before getting started on requests, we need the proper credentials for the Deploy API. We’ll need tokens for both the Deploy API and the App Repository API.
Follow the steps described in both below doc pages to set up your API credentials.
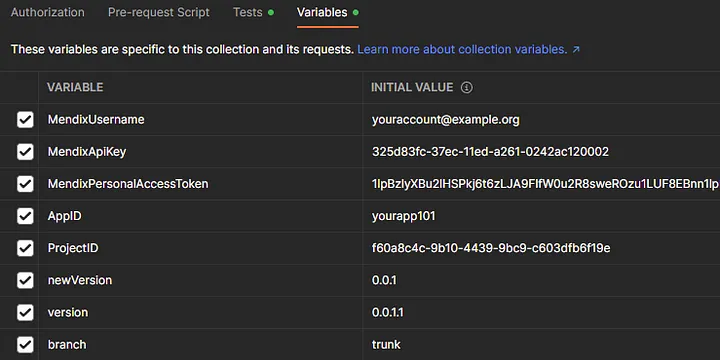
Store the credentials in your Collection Variables as MendixUsername, MendixApiKey and MendixPersonalAccessToken.
Step 2: Test the connection and retrieve the project App ID
Once the connection is working, we’ll need the app’s identifiers. We can retrieve our apps using the following API call. Store the returned AppID and ProjectID as a variable.
GET https://deploy.mendix.com/api/1/apps
Mendix-Username: {{MendixUsername}}
Mendix-ApiKey: {{MendixApiKey}}
Store the AppID and ProjectID in Environment Variables if you work on multiple Mendix apps. Select the right environment before running to deploy different apps each time!
Lastly, store the desired branch that you want to deploy as a variable. All preparation is now done and your variables should look like this:
Step 3: Retrieve the latest revision
Once we have the App ID and Project ID stored in our global variables, we can use them to perform our API calls. The first step is to retrieve the latest revision from the App Repository API. We also need to send our App Repository API credentials in the headers.
GET https://repository.api.mendix.com/v1/repositories/{{ProjectID}}/branches/{{branch}}/commits
Authorization: MxToken {{MendixPersonalAccessToken}}
Once we receive a response, we have to store part of it to reuse it in subsequent requests. I chose to store them as collection variables. To do so, we can run a test to store a collection variable after a successful response:
const response = pm.response.json();
const latestRevision = response.items[0].id;
pm.test("Has latest revision", () => {
    pm.expect(latestRevision).to.not.be.undefined;
    pm.collectionVariables.set("latestRevision", latestRevision);
});
Step 4: Retrieve the current environment package
The Deploy API expects a version number to be included upon package creation. The most logical approach is to retrieve the package that is currently running and add a minor version to that. In order to do so, first set an environment variable as the name of the environment you want to deploy, then execute the following request:
GET https://deploy.mendix.com/api/1/apps/{{AppID}}/packages
Mendix-Username: {{MendixUsername}}
Mendix-ApiKey: {{MendixApiKey}}
From here on out, you’ll need to include the authentication headers every time. Make sure to include both Mendix-Username and Mendix-ApiKey for each request!
Then, store the version as a collection variable using a test script:
const response = pm.response.json();
const version = response.Version;
pm.test("Received current package version", () => {
    pm.expect(version).to.not.be.undefined;
    pm.collectionVariables.set("version", version);
});
Step 5: Create a new package
Once we have the version stored, we can start creating a new package. Before we send the request, we can run a Pre-Request script to calculate the version:
let version = pm.collectionVariables.get("version");
if(version) {
    version.lastIndexOf(".");
    let packageVersion = version.substring(0,version.lastIndexOf("."));
    let minorVersion = packageVersion.substring(packageVersion.lastIndexOf(".") + 1, version.length);
    let majorVersion = packageVersion.substring(0, packageVersion.lastIndexOf("."));
    let newMinorVersion = parseInt(minorVersion) + 1;
    pm.collectionVariables.set("newVersion", majorVersion + "." + newMinorVersion);
}
else {
    pm.collectionVariables.set("newVersion", "0.0.0");
}
Then, we can send a request to start the package build:
POST https://deploy.mendix.com/api/1/apps/{{AppID}}/packages
{
    "Branch" : "trunk",
    "Revision" :  "{{latestRevision}}",
    "Version" :  "{{newVersion}}",
    "Description" :  "New minor version deployed from Postman"
}
And store the returned package ID for later use in a test script:
const response = pm.response.json();
const packageID = response.PackageId;
pm.test("Received package ID", () => {
    pm.expect(packageID).to.not.be.undefined;
    pm.collectionVariables.set("packageID", packageID);
});
Step 6: Check the package build status
The package is now building asynchronously on the Mendix Cloud. In order to proceed, we must wait for the package to be done. We’ll keep sending a request every minute or so until the package is done:
GET https://deploy.mendix.com/api/1/apps/{{AppID}}/packages/{{packageID}}
We can have Postman retry the request after a minute if the test case fails:
const response = pm.response.json();
pm.test("Build succeeded", function () {
    pm.expect(response.Status).to.equal("Succeeded");
});
if (response.Status !== "Succeeded") {
console.log("Package is still building...");
if(response.Status === "Failed") {
    return false;
}
else {
    setTimeout(() => {}, 60000); // wait for 1 minute before retrying
    postman.setNextRequest(pm.info.requestId); // retry the current request
}
Step 7: Transport the package
Once the package is done, we can transport it to the environment. Luckily this is a synchronous action so we don’t have to include any timeouts here.
POST https://deploy.mendix.com/api/1/apps/{{AppID}}/environments/{{environment}}/transport
{
    "PackageId": "{{packageID}}"
}
Step 8: Stop the environment
The final steps are about rebooting the environment so the new package is activated.
POST https://deploy.mendix.com/api/1/apps/{{AppID}}/environments/{{environment}}/stop
Step 9: Start the environment
After stopping the environment, we can start it up again.
POST https://deploy.mendix.com/api/1/apps/{{AppID}}/environments/{{environment}}/start
We’ll store the Job ID in the response for later use:
const response = pm.response.json();
pm.test("Received JobId", function () {
    let jobId = response.JobId;
    pm.expect(jobId).to.not.be.undefined;
    pm.collectionVariables.set("JobID", jobId);
});
Step 10: Check start status (optional)
The request to start the environment is asynchronous again. Optionally, we can send another request using timeouts to keep checking for the start status.
GET https://deploy.mendix.com/api/1/apps/{{AppID}}/environments/{{environment}}/start/{{JobID}}
Keep checking the status using the Postman tests:
const response = pm.response.json();
if (response.Status === "Starting") {
    console.log("Environment is starting...");
    setTimeout(() => {}, 60000);
    postman.setNextRequest(pm.info.requestId);
}
pm.test("Environment has started", function () {
    pm.expect(response.Status).to.equal("Started");
});
Once the environment has started, the collection run will finish and your new package will be available online.
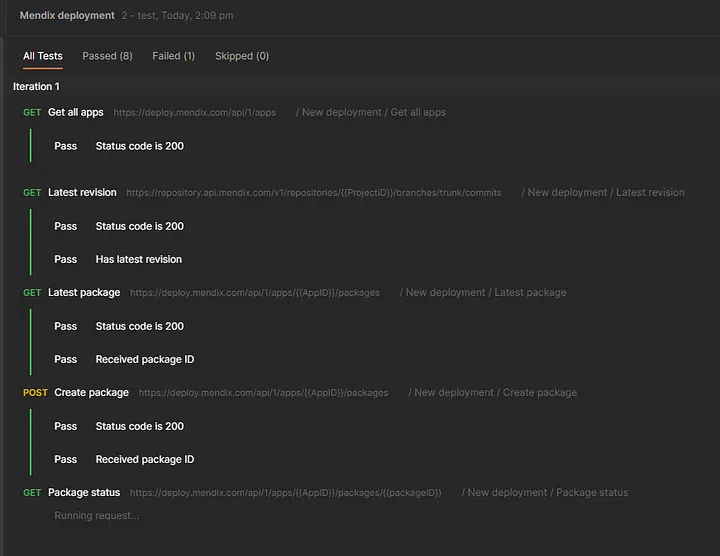
You can now use the Postman Collection Runner to run all the requests in order. This automatically deploys a new package from the latest revision in your selected branch. If anything needs to be fixed as expected, refer to the extensive Mendix documentation available, or leave a comment below!
Next steps
This blog post is meant to give you an idea of what is possible using the available Mendix API services. From here on out, you can expand the functionality as necessary. For my project, I have an integration with the Slack API sending messages when I start and finish a deployment to notify the team. You can send e-mails on deployments, you can integrate the service with a tool like Jenkins for a scheduled deployment. Anything is possible from here on out! I hope this blog post saves you some time in the future and perhaps inspires you to explore new automation capabilities.